Why Curly Fades Fall Apart So Fast
Curly hair fades have gotten complicated with all the conflicting advice flying around — half of it written by people who’ve clearly never had a curl in their life. As someone who spent two solid years cycling through barbershops and waking up Wednesday morning looking like I’d lost a fight with a humidity machine, I learned everything there is to know about keeping a fade intact on curly hair. Today, I will share it all with you.
The problem comes down to three things straight-haired guys genuinely never have to think about. Curl shrinkage — when your barber cuts dry curls, they’re compressed. Moisture hits them later and they spring back up, taking your clean fade line with them. Then there’s frizz, which blurs the blend between lengths in a way that reads as messy rather than intentional. And then there’s growth pattern. Straight hair grows out evenly. Curly hair spirals, so some sections hit the next guard size a full week before others do. Don’t make my mistake of assuming a great cut on Friday will still look great by Monday.
Most fade advice online was written for straight hair. That’s why you’re here. So, without further ado, let’s dive in.
The Right Fade Length for Curly Hair
Here’s what nobody tells you upfront: if your barber is applying straight-hair fade logic to your curls, the cut is already failing before you leave the chair.
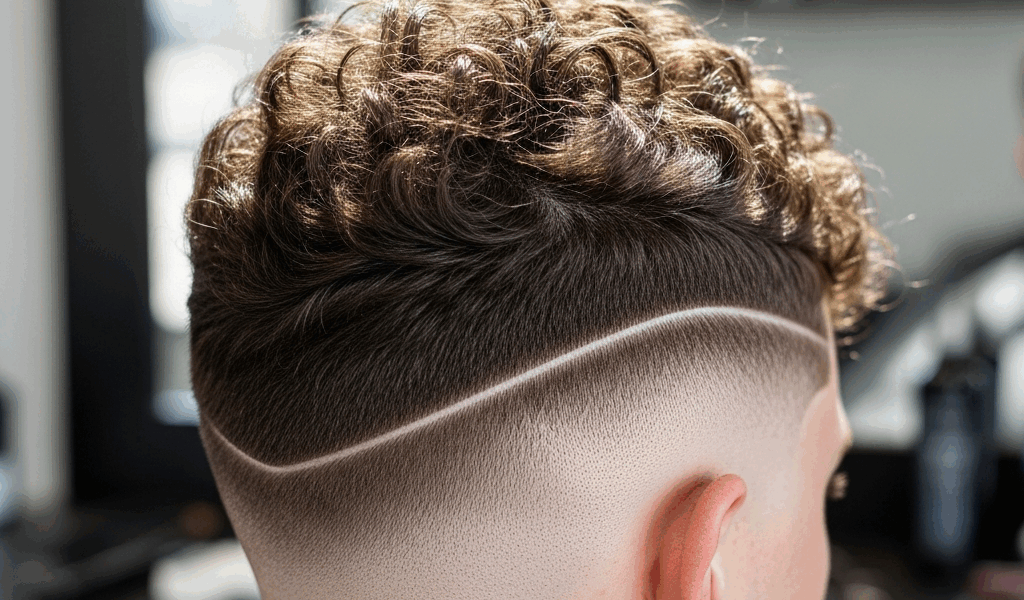
But what is the right guard number for curly hair? In essence, it’s longer than you’d expect. But it’s much more than that. Start at no shorter than a 1.5 on the sides — a 2 is honestly better. I know a 2 sounds like a lot. It’s about 1/4 inch of hair. On curly hair, that 1/4 inch compresses down to almost nothing when dry, then expands back out when moisture hits it. A 1 guard on curly hair isn’t a tight fade. It’s a mistake that looks patchy by Thursday.
The fade line placement matters just as much as guard length. Most guys ask for it to sit around ear level. With curls, push it higher — closer to the temple. This accounts for the upward expansion that curls do naturally, so the cut still reads as sharp even after a few days of growth. A mid-ear fade on curly hair starts looking undefined almost immediately.
Guard progression is where most barbers cut corners. Jumping from a 2 straight to a 4 creates a blend that frizz will destroy in 48 hours. Half-guards fix this — 2 to 2.5 to 3, blending in smaller steps. Most modern Wahl Magic Clips or Andis Fades come with half-guard attachments. If your barber’s kit doesn’t include them, that’s worth knowing. Older equipment often skips them entirely.
What to Tell Your Barber Before They Start
The conversation before the first clipper pass matters more than the cut itself. Probably should have opened with this section, honestly.
First thing: tell them to cut your fade dry — at least if you want to see what your hair will actually look like once you leave. Cutting wet hair stretches the curl. The barber sees one length, cuts to it, and your hair springs back into something completely different once you’re outside. A good barber working with curly hair will cut in the hair’s natural state without you even asking. If they soak it down first without discussing it, that tells you something.
Be specific about placement. Don’t say “high fade.” Say “I want the fade to start right here” and physically point to the temple. Say “I want a 2 on the sides, nothing shorter.” Vague requests produce vague fades, and vague fades on curly hair look worse than just keeping it even all over.
Ask them to work with your curl direction. Curls grow in a specific pattern — usually forward and to the side, depending on your texture. Cutting against that direction creates frizz and blows out the blend faster than anything else. A barber who understands curly hair already knows this. One who doesn’t will fight the grain every time.
One more thing — and this one trips people up constantly. Ask about the top. If the top gets cut too short, the curl flattens and the whole style collapses. Tell them you want at least an inch on top, maybe an inch and a half. That gives the curl enough length to actually stack and define itself. That’s what makes curly fades endearing to us curly-haired guys — when the top actually does its thing and completes the shape.
How to Keep the Fade Looking Sharp Between Cuts
Moisture is simultaneously your best tool and your biggest risk. A light curl cream on damp hair — something like Cantu Leave-In, SheaMoisture Curl Enhancing Smoothie, or even straight coconut oil — keeps the top from going shapeless. I’m apparently sensitive to heavier products and SheaMoisture works for me while Cantu Curl Activator never fully absorbs and leaves my fade looking greasy. Your mileage will vary. Try a few.
The technique: after a shower, don’t soak your hair. Mist it lightly, apply a small amount of curl cream to the top section only, and let it air dry. The curls set back into shape, the fade line stays readable, and you don’t get that bloated, undefined look that comes from overdoing the moisture.
Schedule a cleanup every two to three weeks. That was the single biggest change I made — going from monthly full fades to bi-weekly shape-ups. Curly hair grows unpredictably, so some areas look overgrown while others still look fresh. A cleanup at week two takes about fifteen minutes. It costs $15 to $20 at most shops, far less than a full fade. Staying on that schedule means your barber is only cleaning up edges, not rebuilding the whole cut from scratch.
Sleep on a silk pillowcase. I know. I resisted this for over a year. But cotton pillowcases create friction that shifts your curl pattern overnight and generates frizz that no amount of morning product will fully fix. A basic Slip or even a $12 Amazon version makes a real difference by morning. Don’t make my mistake of dismissing it as unnecessary.
Signs Your Barber Is Not Cutting Curly Hair Correctly
Frustrated by fades that fall apart within days no matter which shop you visit? Watch for these patterns.
If the fade line looks razor-clean on Friday and choppy by Sunday, the line was cut too tight. Curls expand and soften naturally — a hard line fights that expansion instead of working with it. The result looks uneven once your hair fully dries out and does what it always does.
If the blend reads fine right after the cut but looks blocky and separated the next day, the guard jumps are too large. Two to four with nothing in between leaves visible steps that frizz makes brutally obvious. Next visit, say “half-guard increments” out loud. Watch them do each step.
If the top loses its definition within two or three days, it was cut too short. There’s no product fix for this. Curl needs length to coil and stack. Tell your barber directly: “I want an inch and a half on top minimum. I’d rather it be longer than shorter.”
A curly fade that holds its shape is about 30% the quality of the cut itself and 70% whether your barber actually understands curly hair texture. The two are not the same thing. A technically skilled barber who learned exclusively on straight hair will still fail you, not out of incompetence but out of habit. This new approach — longer guards, dry cutting, higher fade placement, half-guard blending — took off several years later in the natural hair community and eventually evolved into the curly-specific technique enthusiasts know and rely on today. If your barber isn’t using it, find one who is. Your texture isn’t the problem.


Stay in the loop
Get the latest find my haircut updates delivered to your inbox.